

- How To Customize Your WordPress Website With CSS And ChatGPT
 It's to be expected that you're not going to find a WordPress Theme that suits all of your design needs and desires, and you're going to want to customize your website. In this article I'll try to explain as simply…
 - How To Make Money With Google Adsense
 Google Adsense is one way that many people make money from their website or blog and generate a steady income stream. With Google Adsense, you can put ads on your website and get paid when people click on those ads….
 - How Affiliate Marketing Works Step By Step
 Affiliate marketing is a popular way for website owners and bloggers to make money online by promoting other businesses products and services. In this article, I'll show you step by step how affiliate marketing works so you can understand it…
 - How To Create A WordPress Website
 WordPress is one of the Internet's most popular content management systems (CMS), powering millions of websites worldwide. If you want to create a website or blog with WordPress, you'll need to know how to install and customize the platform. In this guide…
 - Grammarly VS QuillBot Review: The Best Writing Assistant
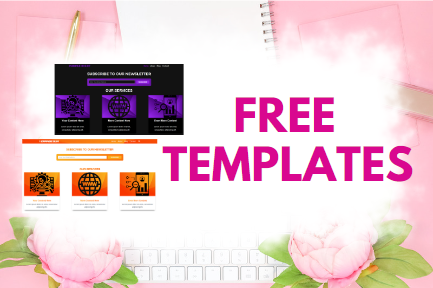
- How Systeme.io Can Kickstart Your Business For Free
 Are you looking for a cheap platform that has everything you need to start an online business? Systeme.io is perfect for entrepreneurs and small business owners. With so many things to consider, from creating a website to managing your email…
 - Selling On Social Media Is Easy with Koji – And Its Free.
 1. Introduction to Koji: A Game Changer No more having to convince your followers to leave the comfort of their social media platform, to visit your website or storefront. Selling is easier when you bring your storefront directly to your…
 - TMDHosting: Best Shared Web Hosting Review
 TMDHosting was one of the winners of our comparison review on the Top 10 Shared Website Hosting for 2023. They came in first for both their Starter and Enterprise Plan with the combination of best features and price. So we thought…
LATEST POST
- How To Customize Your WordPress Website With CSS And ChatGPT
It's to be expected that you're not going to find a WordPress Theme that suits all of your design needs and desires, and you're going to want to customize your website.
In this article I'll try to explain as simply as possible, how to customize the design of your WordPress website using CSS and ChatGP.
Don't Worry, You Won't Break Your Website
That's the first important point to know, you can't break your website with this method.
If things look a bit wonky, just delete the section of CSS that you added and click on publish. Your website will revert to it's original CSS settings.
But I'm getting ahead of myself. Let's start from the beginning.
What Is CSS?
CSS, or Cascading Style Sheets, is a language used control the layout, colors, fonts, and other visual elements of a website. It is used in conjunction with HTML (the language used to create web pages) to
CSS, or Cascading Style Sheets, is used to control a website's layout, colors, fonts, and other visual parts. It works with HTML, the language used to make web pages.
In simple terms, CSS lets you style HTML elements to change how they look on a page. This includes things like background color, the size of the font, and where the text and images are placed.
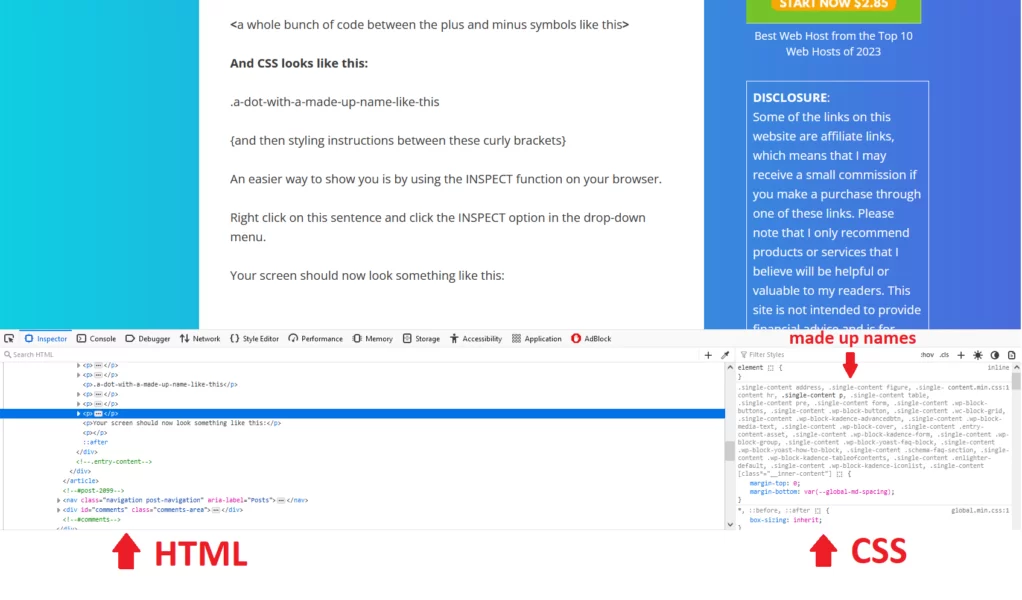
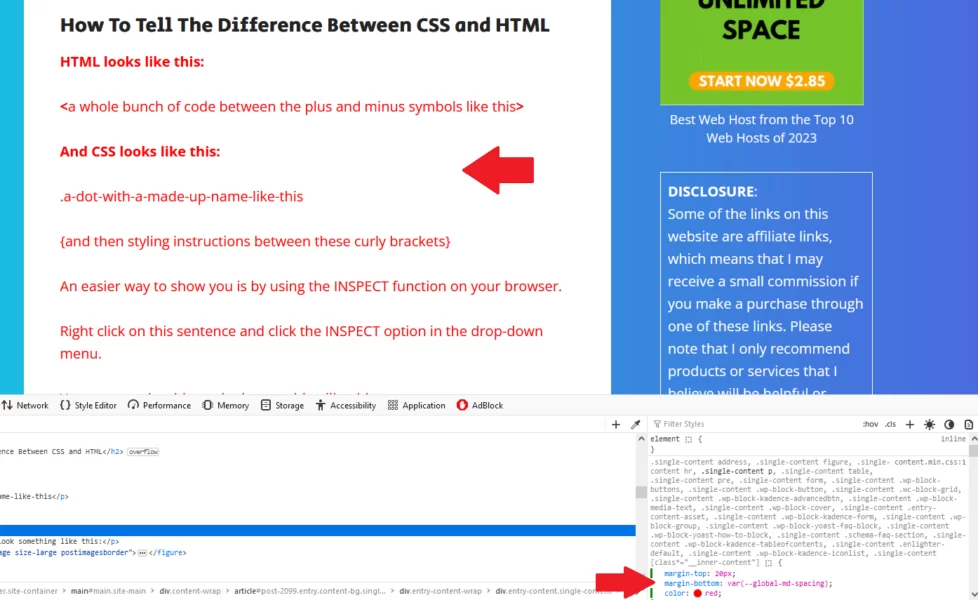
How To Tell The Difference Between CSS and HTML
HTML looks like this:
<a whole bunch of code between angle brackets like this>
And CSS looks like this:
.a-dot-with-a-made-up-name-like-this
{and then styling instructions between these curly brackets}
#or-a-hash-with-a-made-up-name-like-this
{and then styling instructions between these curly brackets}
Using The INSPECT Function On Your Browser
An easier way to show you the difference between HTML and CSS is by using the INSPECT function on your browser.
Right click on this sentence and click the INSPECT option in the drop-down menu.
Your screen should now look something like this:
To completely change the appearance of your website, all you need to change is the CSS. Which is easier than it looks right now. This INSPECT feature is available on most Browsers and is a testing ground for Web Developers.
For example, I could change the CSS in the above image to say margin-top: 20px; just by clicking on the pink zero and changing it to 20px.
I can also add new CSS, by clicking on any of the pink writing and pressing Enter. Then I can add my CSS on a new line. I'm going to change the text to red by adding the following code:
color: red;And the page will change immediately like this:
NOTE: Using the INSPECT function in your browser doesn't change anything for people viewing your website. It only changes for you in your browser, and it all goes back to normal once you hit the Refresh button. This function is a useful tool for trialing your CSS, before making it permanent on your website.
How To Change The CSS In A Single Post
You can change individual elements in a single post by giving each element a unique name.
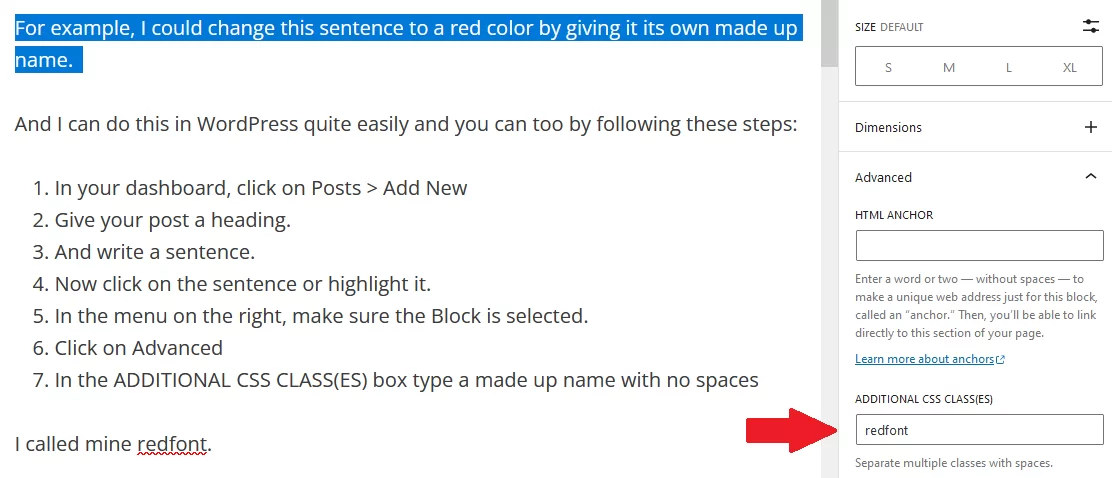
For example, I could change this sentence to a red color by giving it its own made up name.
And I can do this in WordPress quite easily and you can too by following these steps:
- In your dashboard, click on Posts > Add New
- Give your post a heading.
- And write a sentence.
- Now click on the sentence or highlight it.
- In the menu on the right, make sure the Block is selected.
- Click on Advanced
- In the ADDITIONAL CSS CLASS(ES) box type a made up name with no spaces
I called mine redfont.
8. Click on Save Draft.
Adding CSS To Your Website
9.Now go to Appearance > Customize > Additional CSS
Here is where you’re going to place all of your Custom CSS.
10. Type the following CSS in the box provided but replace the redfont with your made up name. Don’t forget the dot at the start:
.redfont {
color: red;
}
11. Click on Publish
12. Go back to your post and click on Preview > Preview in new tab
Your post should look something like this:

You can add more customization like the following:
.redfont {
color: red;
background-color: yellow;
font-size: 30px;
}
And it will look like this:

Adding Custom Colors In CSS
To do more complex colors, you need to use hexadecimal color codes, which start with a hash (#) and has a series of letters and numbers, like this:
#ED1C24
This is what it looks like in CSS
.redfont {
color: #ED1C24;
}
To find the hex code for any color, install a color picker extension on your browser like ColorPick Eyedropper. These extensions let you click on any color on the internet and get it's hex code.
Change Any Element On Your Website With CSS
I’ve shown you how to customize any element inside your post which can be a handy skill to have. But now it’s time to learn how to change any element on your website.
To demonstrate, I’m going to change the navigation bar at the top of my website. Follow these steps with me:
- Go to your Homepage, right click on one of the links in the navigation bar and click on INSPECT.
I clicked on Blog, and it looks like this:
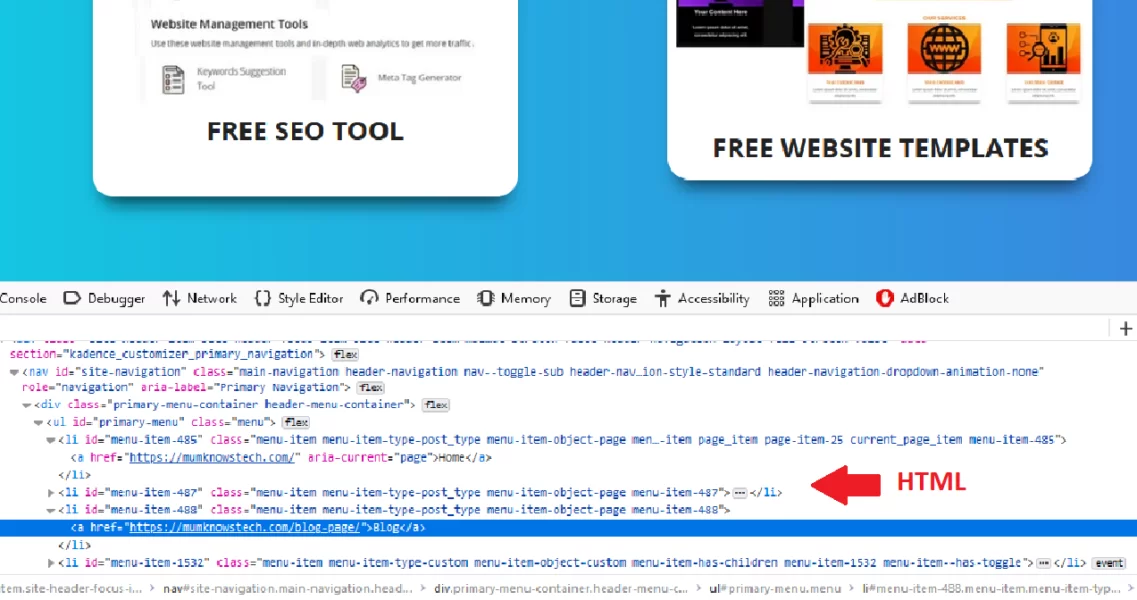
Identifying ID And CLASS Tags
We need to focus on the HTML in the above image. Specifically all the ID and CLASS tags which look like this:
id=”menu-item-487″
class=”menu-item menu-item-type-post_type menu-item-object-page menu-item-487″
Notice the spaces in the above CLASS name. These are each individual CLASS names and can be targeted individually in your CSS, like this:
.menu-item {
font-family: arial;
}
.menu-item-type-post_type {
background-color: blue;
}
.menu-item-object-page {
font-size: 40px;
}
.menu-item-487 {
text-transform: uppercase ;
}
If I saved the above code in Appearance > Customize > Additional CSS, my navigation bar would look like this:
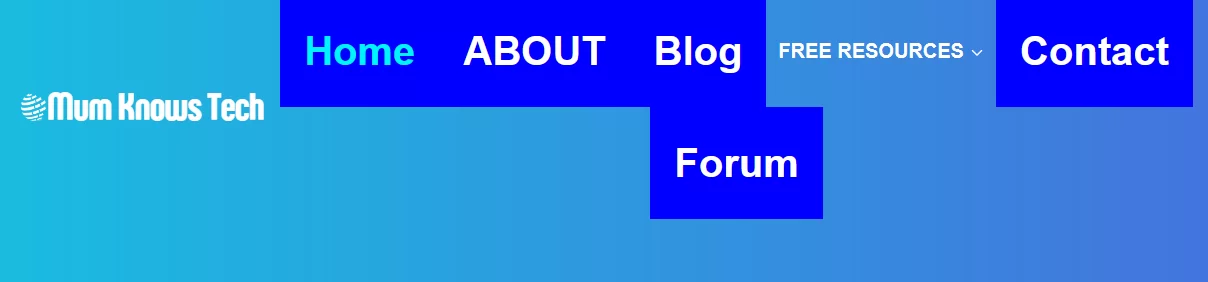
Not the prettiest but hopefully you get the point.
Targeting ID And CLASS Tags
IMPORTANT: To target CLASS tags you start with a dot, like this:
.menu-item-487 {
font-family: arial;
}
But if you want to target an ID tag you start off with a hash like this:
#menu-item-487 {
font-family: arial;
}
These ID and CLASS names are unique and made up by the person who made the WordPress theme.
Every element on your website has at least one ID or CLASS name, and we use these names in our CSS to style each element on our website.
The easiest way to find them is by right clicking on the element on your website and pressing INSPECT. The ID or CLASS name is the first one listed above the blue line, as shown below:

It might take you a little time to find the right ID or CLASS tags. In the example above, it has only selected one of the links in my navigation bar.
To select the ID or CLASS for the whole navigation bar, I need to scroll up in the HTML until I find it.
The INSPECT feature makes it easier to find by highlighting the section on your website when you hover over the HTML:
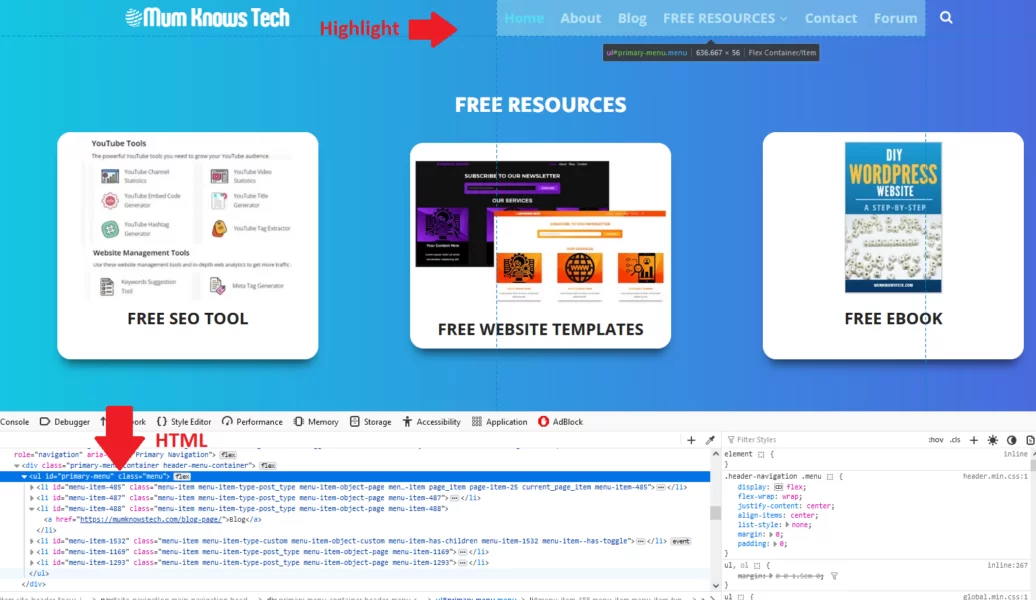
It's a good idea to change some of the CSS in the INSPECT screen to make sure you have the right ID or CLASS tags.
Using ChatGPT To Write Your CSS
If you haven't already, read my article about ChatGPT called Blogging With ChatGPT: For Writing, Designing and Social Media.
Once you've found your ID or CLASS tags you can get ChatGPT to write your CSS for you by giving it prompts like the following:
Can you write me CSS for the following: class tag=site-header, make the background a gradient beige. id tag=primary-menu, make the font arial, dark brown, 18px, and uppercase.
And here's what it gave me:
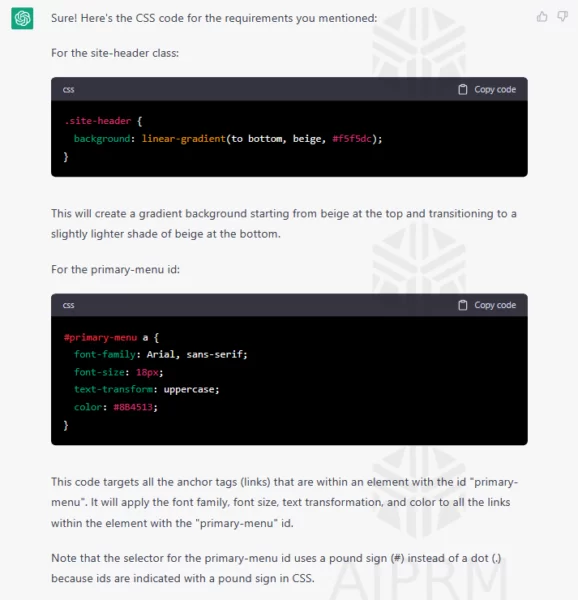
Now all I have to do is copy this code into Appearance > Customize > Additional CSS and click on Publish.
And this is what my navigation bar looks like now:

Again, not the prettiest but hopefully you get the point.
Conclusion
Hopefully you found this article helpful. I've tried to make it as simple as possible. Let me know in the comments if it needs improvement. Please also feel free to leave me a comment if you need help with your CSS.
If you would like to learn HTML and CSS for free, from the same experts that I learned from, visit w3schools.com